


How to remove oxidation from old RCA audio cable connectors – 2026 Exclusive Blog
Breathing New Life into Vintage Sound: How to Remove Oxidation from Old RCA Cables
If you’ve ever dusted off a vintage turntable or a 90s-era receiver only to be met with a crackling “pop” or a maddening hum, you aren’t alone. We’ve all been there—excited to hear that warm analog sound, only to realize that time hasn’t been kind to our gear.
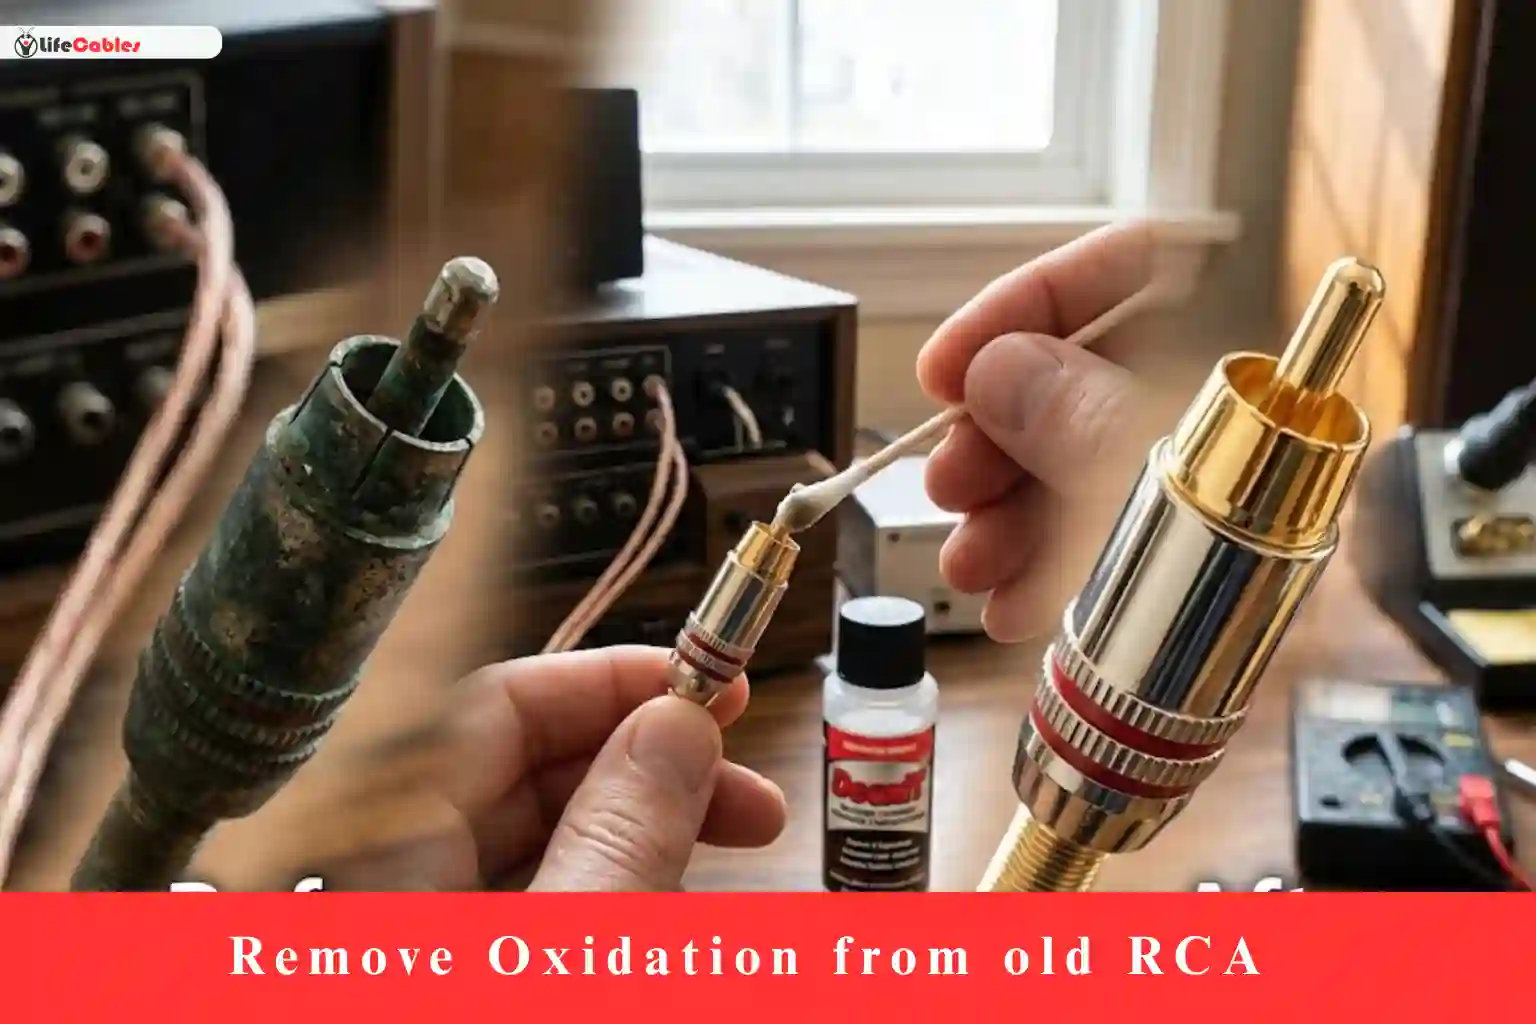
The culprit usually isn’t a broken wire; it’s oxidation. Over years of sitting in humid basements or even just standard living rooms, the metal on those RCA connectors reacts with oxygen. This creates a thin, non-conductive layer of “crust” that acts like a wall between your music and your speakers.
As someone who has spent a decade tinkering with everything from high-end audiophile setups to thrift-store finds, I can tell you: Don’t throw those cables away. Most of the time, they just need a little TLC.
In this guide, I’m going to walk you through the professional way to clean RCA connectors. No “hacks” that ruin the metal—just proven methods to get your signal path crystal clear.
Why Does Oxidation Happen? (The Science of the Hum)
Before we grab the cleaners, it’s helpful to understand the enemy. RCA connectors are typically made of brass or copper, often plated with nickel or gold.
- Nickel/Silver Plating: These are prone to “tarnish.” It looks like a dull grey or black film.
- Gold Plating: While gold doesn’t oxidize, the cheaper base metals underneath can “leach” through microscopic pores in the gold, causing a cloudy appearance.
- Copper: This turns that tell-tale greenish-blue.
This oxidation increases electrical resistance. In the world of audio, resistance is the enemy of detail. It rolls off the high frequencies and introduces noise.
The Pre-Game: What You’ll Need
To do this right, you need the right chemistry. Avoid WD-40 or harsh abrasive sandpaper; these can leave oily residues or strip the plating entirely.
| Tool/Material | Purpose |
| Isopropyl Alcohol (90%+) | For general degreasing and light cleaning. |
| DeoxIT D5 or G5 | The “Gold Standard” contact cleaner for electronics. |
| Microfiber Cloth | Lint-free wiping. |
| Magic Eraser (Melamine Sponge) | A gentle abrasive for stubborn “crust.” |
| Cotton Swabs (Q-tips) | For getting inside the “ground” ring. |
| Toothpick | For cleaning the tiny center pin hole on the female jack. |
Step 1: The Initial Degrease

Often, what looks like oxidation is actually just a decade of dust mixed with skin oils.
- Dampen (don’t soak) a cotton swab with 90% Isopropyl Alcohol.
- Scrub the outer ring (the ground) and the center pin of the RCA plug.
- If the swab comes off black or brown, repeat until it stays white.
Expert Tip: Always clean the female jacks on your receiver too! There’s no point in having a clean cable if the port it plugs into is filthy.
Step 2: Breaking Through the Oxidation
If the metal still looks dull after the alcohol bath, you need a chemical deoxidizer.
The DeoxIT Method (Recommended)
DeoxIT is a specialized solution that dissolves oxidation without harming the base metal.
- Spray a small amount of DeoxIT D5 onto a swab.
- Apply it to the connector and let it sit for about 2–3 minutes. The chemicals need time to “eat” the oxidation.
- Vigorously scrub with a fresh swab. You’ll likely see a green or black residue—that’s the oxidation leaving the building.
- Wipe dry with a microfiber cloth.
The Magic Eraser Method (For Heavy Corrosion)
If the oxidation is physically “bumpy” or won’t budge, a tiny piece of a Magic Eraser works wonders. It’s a micro-abrasive.
- Gently rub the center pin and the outer ring.
- Caution: Don’t overdo it on gold-plated cables, as you can rub the gold right off. Use just enough pressure to restore the shine.
Step 3: Cleaning the “Hard to Reach” Spots
The most overlooked part of an RCA cable is the inside of the outer ground ring. This is where the contact is tightest.
- Take a cotton swab and “fluff” the end a bit.
- Twist it inside the circular “petals” of the RCA plug.
- For the female jack on your amp, use a toothpick dampened with cleaner to gently swipe the internal contact points.
Step 4: The Finishing Touch (Sealant)
Once the metal is shiny, it’s vulnerable. It’s now “naked” metal exposed to air, meaning it will oxidize again quickly.
If you used DeoxIT G5 (Gold), it actually leaves a microscopic protective layer that prevents future oxidation and improves conductivity. If you used alcohol, consider a tiny dab of specialized “contact enhancer” to keep the air out.
When Should You Just Replace the Cable?
I’m all for restoration, but sometimes a cable is a “lost cause.” Replace it if:
- The cable is “crunchy” when bent (the internal copper is brittle).
- The oxidation has traveled inside the plastic jacket (look for green wires through clear insulation).
- The connector is loose and cannot be crimped back into a tight fit.
Final Thoughts: The Result
After a thorough cleaning, you’ll likely notice an immediate difference. The “static” when you wiggle the wire should be gone, and you might even find the soundstage feels a bit wider. It’s a meditative process that connects you to your gear—and saves a few bucks in the process.
Pro Tip: Make cleaning your connectors a once-a-year habit. It takes 5 minutes and keeps your system sounding like it did the day you bought it.